Creating my own VPN
VPN Mismatch
To be honest, much of what we hear about VPNs in the cybersecurity market isn’t entirely accurate. Most of the connections we make to websites are already secure, as HTTPS provides encryption that protects data in transit. While VPNs can be used to mask the websites we visit, this effectively shifts the burden of trust from our ISP to the VPN provider itself.
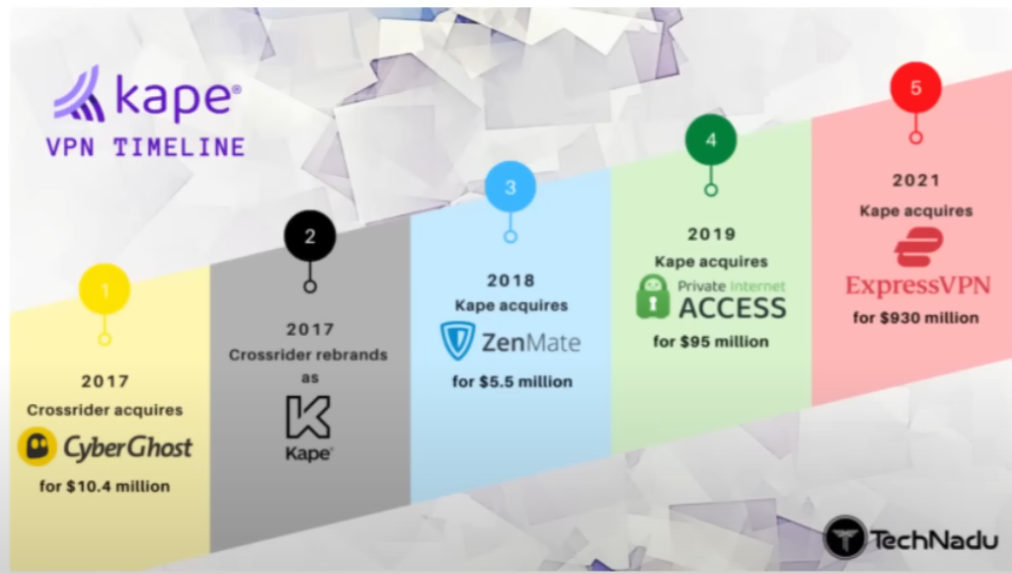
Take ExpressVPN, for example. It’s owned by Kape Technologies, a company that previously operated under the name Crossrider, known for distributing malware and adware. This history raises questions about privacy and trustworthiness when using VPNs.
 Kape Technologies Timeline - TechNadu
So if unencrypted connections that VPN’s are made to protect ourselves from are nothing to worry about then what should they be used for?
The Real Use
Changing your IP address is the main use here.
The VPN makes the request to a website instead of your own IP address, this will help avoid targetted ads. This could be useful for someone who is a Twitch Streamer who wants to avoid making their IP public and potentially getting DOS’ed by malicious viewers. It is also useful for watching region locked content that is only allowed in certain countries.
But there is another problem with this….
The IP’s used by VPN providers are also public, so this means the website creator could just deprioritize or block connections made by users using the VPNs. Using a VPN provider means you are also sharing the resources with others that signed up for the same service.
Hence the PVPN!
PVPN
A Private VPN is a virtual private network that I’ll guide you through setting up, allowing you to select your own IP address for greater control and privacy, without the risk of VPN companies monitoring your activity. Unfortunately, not all VPNs are created equal—they vary in encryption methods, speeds, firewall ports, and configuration options. This guide will help you establish a custom VPN setup that maximizes security and suits your specific needs.
Setup
We will first setup a VPS, the advantage is that we can do this entirely through the browser or the command line versus manually installing an OS on an old server lying around or a VM. Therefore we do put some trust in the VPS provider.
Use any VPS provider you are comfortable with, there are many out there. Furthermore the OS to be used is Debian. Once it is spun up ssh to it, I am using a key pair so I do not need to enter a password.
Basic Hygiene
1
sudo apt update && sudo apt upgrade
This should be done on the first time connection to any VPS, this will update all of our packages and dependencies.
1
2
3
4
useradd -m example_username
passwd example_username
groupadd wheel
usermod -G wheel username
These two commands will create a user and set the password. Then a new group called wheel will be created and the new user will be added to the group. This is to follow best practices as accessing anything with root all the time is not preferred.
1
%wheel All-(All) All
Will give everyone in the wheel group sudoer privileges. The path is /etc/sudoers.
Next, an ssh key will need to be created if it hasn’t already. Since I am using a larger cloud provider this was a required step on the first time setup. However I will list the steps since not everyone will using the same hosting service.
1
ssh-keygen -t rsa -b 4096
This command will create an RSA key with 4096 bits, the option to name the key will follow as well as creating a passphrase for the key too. After that the key file must be copied to the PVPN via the scp command.
1
scp keyfile.pub username@ipaddr
Following that an ssh folder will need to be created on the PVPN. And the content of the key will need to be catted out to .ssh/authorized_keys.
Furthermore the config for the SSH daemon must be changed, to deny root logins.
1
2
3
4
sudo vim /etc/ssh/sshdconfig
PermitRootLogin no
PubkeyAuthentication yes
PasswordAuthentication
Optional: The SSH port can be changed off of 22, this would just avoid automatic scanning done by bots for open ssh ports. This is somewhat similar to the bots scanning for open RDP ports in my article My First Security Project.
Following the SSH config we can ssh as the new user, but the key location will need to be specified on the first time connecting.
Setting up the VPN
If we did not care about compatability WireGuard would be used, but the protocol itself is very new. So, OpenVPN will be used.
1
sudo apt install openvpn
Then a setup script will be used for openVPN here. Please read through the code of any script that you would run on your VPS to avoid running anything suspicious.
On my end I will view the RAW file on github then curl that URL whcih looks like raw.githubusercontent.... Then I will make the script executable via the command chmod +x. Finally, run the script as root with sudo ./openvpn-install.sh.
The script will first validate your public IPv4 address, check for IPv6 connectivity then let you select a port
1
2
3
4
5
6
Do you want to enable IPv6 support (NAT)? [y/n]: n

What port do you want OpenVPN to listen to?
   1) Default: 1194
   2) Custom
   3) Random [49152-65535]
I will use the default port for OpenVPN as VPN’s are not blocked on my network. After that more details are required, for example if you want to use UDP/TCP, specifying a DNS resolver.
After the setup a .ovpn file is created. But first I will edit the openvpn/server.conf file and change the verb 3 to verb 0 so no logs are stored by my PVPN.
Lastly, use sftp or another method to copy the .ovpn file to your client.
Final Steps
Once the .ovpn config file is on your local machine, we are ready to connect to the VPN.
Just install open vpn on your local machine and use the command sudo openvpn --config desktop.ovpn. To configure and complete the sequence to change your IP address freely and setup your own VPN!
Since we have our own VPN running on a newly created VPS the IP address will not be recognized. Therefore it will not be blanket banned by services that block users using widely known VPN’s.
Thank you for reading and stay tuned for more!

